
Webcam Watcher Online Help
![]() Chapter 3 - Controlling and
Viewing Webcams
Chapter 3 - Controlling and
Viewing Webcams
![]() Starting and Stopping Webcams
Starting and Stopping Webcams
![]() Autoupdate
Autoupdate
![]() Selecting Webcams to view
Selecting Webcams to view
![]() Viewing Saved Pictures
Viewing Saved Pictures
![]() Finding Webcams
Finding Webcams
![]() Image Enhancement
Image Enhancement
![]() Next
Chapter
Next
Chapter
![]() Back
to Index
Back
to Index
You can start all the webcams by clicking the Start All button at the top of the screen. And you can stop them all my clicking the Stop All button.
You can start or stop the current webcam by using the VCR-style play and stop controls at the bottom of the screen.
You can start the currently selected webcams by selecting Control > Start Selected Webcams. You can also press F7, or right click on the webcams and choose the option.
![]()
![]() TIP
TIP![]()
![]() To select more than one webcam, use shift-click
or control-click
To select more than one webcam, use shift-click
or control-click
When the AutoUpdate button is down, any new pictures arriving are automatically shown. If the button is up, only new pictures for the current webcam are shown. You can toggle the Autoupdate button by pressing the Insert key.
The drop-down box above the webcams panel lets you choose which webcams you want to see visible. Apart from the normal All Webcams, you can select
You can scan back and forward through the pictures that have been saved for a webcam by pressing the Left and Right arrow keys. If you hold the keys down you can get a high-speed slide show of the pictures.
Shift-left-arrow will take you to the first picture; Shift-right-arrow will take you to the last picture.
The controls on the lower toolbar can also be used to scan through the pictures.
Click the Find button (or press control-F) to find one or more webcams.

Enter the text you want to find and click the Find button. This will match the Description or the Picture URL of the webcam. You can also select which categories of webcam you want to search using the top drop-down box.
Double-clicking on a webcam will display that webcam.
You can select several webcams, as shown above. When you click OK these webcams are selected and shown in the webcams panel.
Or you can click Select All. This shows all of the webcams in the webcams panel.
Webcam Watcher includes an intelligent Image Enhancer that can be used to correct webcam images. Webcams often make less-than-perfect pictures, especially under poor lighting conditions. This is not surprising as they are usually low-cost devices and they don't have much time to create and compress images.
How it works
The basic idea of the Image Enhancer is to make the most of the information in the original image. It does this by correcting the "spectral spread" of the image. Look at the picture below to understand. The dark picture is an original webcam image. Below that is a graph showing the distribution of light and dark - as you can see, most of the picture is dark.
The original image
The light/dark distribution of the original image
Webcam Watcher enhances the image by making the distribution more even, like this:
The light/dark distribution after enhancement
...and the resulting image.
Note that not all images show such a dramatic improvement. Usually the most improvement is seen with pictures that are poor to start with.
How to use Image Enhancement
You can turn Image
Enhancement On and Off using the button on the top
toolbar : ![]() (down is
ON, up is OFF)
(down is
ON, up is OFF)
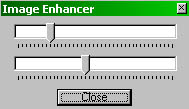
You can adjust the Image Enhancement Settings by right-clicking on the button. This opens a small floating box like this:

The two sliders control two of the parameters in the enhancement process. They are called Level and Depth , although it's not easy to describe exactly how the controls relate to the process. You will find that they have very different effects depending on the original image.
Some things to note about the Image Enhancer:
(C) 1998-2001 Beau Software All rights reserved ....www.webcam-watcher.com ... www.beausoft.com ... [email protected]